Cheap File Server

I purchased items today for the file server project. I’ll bring the printed invoices to DMS for reimbursement when everything arrives. The total came to $1,570.02 but I might need to buy a few more little things like a case fan or SATA cables from Tanner Electronics.

6x – WD Cavier Green 3TB SATA III 64MB Cache Bare/OEM Desktop Hard Drive WD30EZRX
1x – ASRock C2750D4I Mini ITX Server Motherboard FCBGA12383 DDR3 1600/1333
2x – Kingston 4GB 240-Pin DDR SDRAM ECC Unbuffered DDR 1600 (PC3 12800) Server Memory Model KVR16ES8/4
1x – Antec P100 Black ATX Mid Tower Computer Case
1x – Thermaltake TR2 TR-700 700W ATX 12V V2.3 & EPS 12V SLI Ready CrossFire Ready Active PFC Power Supply

Disk 89.99

Motherboard 409.99

Memory 41.99 each * 2 = 83.98

Case  74.99

Power Supply 59.99

Total:  $718.94


It’s basically the same setup as what was proposed to the board but with a better case, better power supply, same motherboard and processor, 8GB of RAM instead of 32GB (can be expanded later if needed), and without the spare disk so if one dies we’ll have to RMA it or buy another. Also the motherboard and processor dropped $60 in price since the board meeting (woot!). Less memory and no spare disk reduced the cost significantly. Less memory will impact the performance but probably not enough for people to bitch about.

So what you end up with is a lower power (20 watt TDP) 8 core processor at 2.4GHz, 8GB of memory (expandable to 64GB), 24TB of raw disk space (16TB with two block parity, RAID Z2), and a 700 watt power supply (overkill but was on sale). It’ll have all the bells and whistles setup like automatic rolling snapshots. Will probably need help from ops committee for LDAP integration if that’s wanted (I’d think yes but it’s their call, like read permission for everyone, write permission just for your files).

Bash Code Injection Vulnerability via Specially Crafted Environment Variables (CVE-2014-6271, CVE-2014-7169)

You can read all the details here and here, but below is a synopsis for quick checks.

Are you vulnerable?

env 'VAR=() { :;}; echo Bash is vulnerable!' 'FUNCTION()=() { :;}; echo Bash is vulnerable!' bash -c "echo Bash Test"

Linux Performance and Tuning RHEL 6

Built based on this

What is a bottleneck?

Types of bottlenecks

How to identify a bottleneck

ps -o pid,tt,user,fname,wchan -C apache (why is a process around and what is is waiting on)

ps -uapache -o wchan=WIDE-WCHAN-COLUMN,cmd

iftop   http://www.thegeekstuff.com/2008/12/iftop-guide-display-network-interface-bandwidth-usage-on-linux/

disk io issues:

iostat -d -x
Linux 2.6.32-431.29.2.el6.x86_64 (web.x.com) 09/25/2014 _x86_64_ (16 CPU)

Device: rrqm/s wrqm/s r/s    w/s rsec/s      wsec/s avgrq-sz     avgqu-sz await    svctm %util
sda        0.37       12.34    8.04 5.58 1299.72 143.13   105.96          0.81        59.82    9.55    13.01

http://bencane.com/2012/08/06/troubleshooting-high-io-wait-in-linux/

Reference:
http://www.linux-tutorial.info/modules.php?name=MContent&pageid=84
http://www.gurkulindia.com/main/2013/03/help-me-to-find-the-linux-performance-bottleneck/
Pinpointing I/O bottlenecks on Linux
http://www.cyberciti.biz/tips/linux-resource-utilization-to-detect-system-bottlenecks.html
http://www.cloudiquity.com/2012/05/finding-disk-bottlenecks-on-linux/
How to Monitor Apache Web Server Load and Page Statistics
How to graph Apache Statistics on Cacti
20 Command Line Tools to Monitor Linux Performance

Using Vmware Workstation to create an internal development environment

First.. to be able to see the ip address quickly from the console in case it changes.


wget http://www.digitalw00t.com/blog/wp-content/uploads/2014/09/ip.update.pl_.zip
sudo unzip -d /root ./ip.update.pl_.zip
chmod +x /root/ip.update.pl

echo “cp /etc/issue.orig /etc/issue” >> /etc/rc.local
echo “cp  /etc/issue.net.orig /etc/issue.net” >> /etc/rc.local

cp /etc/issue /etc/issue.orig
cp /etc/issue.net /etc/issue.net.orig

echo “/root/ip.update.pl >> /etc/issue” >> /etc/rc.local
echo “/root/ip.update.pl >> /etc/issue.net” >> /etc/rc.local
/root/ip.update.pl >> /etc/issue
/root/ip.update.pl >> /etc/issue.net

Using OpenSSL to create and manage certificates

Original page here written by Sander Van Vugt

Public/private keys are essential tools for secured traffic on the Internet. Each has its own place and function; you configure critical services with a private key and make a public key available to users who want to use that service. It is common to use an external commercial service such as Verisign to sign the public key in a public key certificate, thus guaranteeing the key’s authenticity. For in-company use, however, there is no need to do that. In this tip, you will learn how to set up your own Certificate Authority (CA) using the command openssl, a product of the OpenSSL project. You will then create a public key certificate with that CA. This is an easy way to assure clients they will be secure while interacting with your email server.

Setting up a Certificate Authority

To manage certificate-related issues on Linux, you can use the openssl command. This command is used to create and manage certificates and certificate authority for your server. In this section, you’ll learn how to use the openssl command to create a certificate and a self-signed CA. In this example, the self-signed CA is the highest level in the CA hierarchy, so it will be a root-CA. The following procedure explains how to proceed:

  • Decide where you want to create the directory structure in which you will put the CA. The directory structure should be inaccessible to other users. For example, the home directory of the user root might be a good location because ordinary users don’t have access to it.
  • Some subdirectories must be created in this directory. From the directory of your choice, start with mkdir root-CA to create a subdirectory in which the CA will store its files.
  • Next, you must create some subdirectories in this root-CA directory. The names of these subdirectories are pre-defined in the configuration file /etc/ssl/openssl.cnf:. Hence, you shouldn’t try anything creative unless you are willing to change all settings in this configuration file as well. The command mkdir certs newcerts private crl will create these directories for you. They serve the following purposes:
  1. Certs: All signed public key certificates are stored here. You may make this directory publicly accessible.
  2. Newcerts: This directory stores all new certificates that haven’t yet been signed.
  3. Private: The private key of your server is stored in this directory. Protect it like the crown jewels! The least you should do is give this directory permission mode 700 (chmod 700 private).
  4. Crl: If any are needed in your environment, Certificate Revocation Lists are stored in here.
  • To make creating the certificate for the root-CA a bit easier, open the configuration file /etc/ssl/openssl.cnf. In this file, you will find some default settings used when creating new certificates. Read the file and modify all settings as required.
  • Make sure that all directory paths are OK by modifying the HOME and the dir variables. Also, it is a good idea to set the names of the certificates to the right value. Listing 1 shows what this could look like. All non-essential parameters have been omitted from the list.

Listing 1: Some important settings from the openssl.cnf file

HOME = /root/root-CA dir = /root/root-CA ... certificate = $dir/cacert.pem ... private_key = $dir/private/privkey.pem ...

Now that you have tuned the configuration file the proper way, you can create a self-signed certificate for the root-CA. The following command creates the certificate with a 1024-bits RSA key that is valid for 10 years:
openssl req -newkey rsa:1024 -x509 -days 3650 -keyout private/privkey.pem -out cacert.pem
The main command used here is the openssl command. This command has several parameters that operate as if they were independent commands. The parameter req in this example is used to create the self-signed certificate (check its man page to see everything it can be used for). To make sure there is no misunderstanding regarding the place where these keys are created, the parameter -keyout is used to specify where to put the private key and -out is used to define the location of the public keythat you create. All the other options are used to specify with what parameters the key must be created.

Creating the key will start an interface in which several questions are asked (see Listing 2). The most important of all these questions is the prompt for a passphrase. Since we are creating a root-CA in this example, using a passphrase is mandatory; otherwise, it would be possible for anyone who accessed your machine to create public key certificates signed by this CA, which would make this CA worthless.

Listing 2: While creating the public/private key pair, you are prompted for the associated owner information and a passphrase to protect the private key.

root@mel:~/root-CA# openssl req -newkey rsa:1024 -x509 -days 3650 -out cacert.pem -keyout private/privkey.pem Generating a 1024 bit RSA private key ....++++++ .....................++++++ writing new private key to 'private/privkey.pem' Enter PEM pass phrase: Verifying - Enter PEM pass phrase: ----- You are about to be asked to enter information that will be incorporated into your certificate request. What you are about to enter is called a Distinguished Name or a DN. There are quite a few fields but you can leave some blank. For some fields there will be a default value; If you enter '.', the field will be left blank. ----- Country Name (2 letter code) [AU]:NL State or Province Name (full name) [Some-State]: Locality Name (eg, city) []: Organization Name (eg, company) [Internet Widgits Pty Ltd]: Organizational Unit Name (eg, section) []: Common Name (eg, YOUR name) []:Myself Email Address []:myself@example.com

Note: You should always watch the output of the openssl commands carefully. It’s not easy to see errors, but it is easy to make them through small typing mistakes. You should fix all errors before proceeding to the next step.

Congratulations! You now have your own root-CA. This makes it possible to create your own certificates and use them for any purpose. For example, think of server certificates that are used for secured email, or client certificates used to connect a notebook to a VPN gateway.

Creating the OpenSSL database and key pair
Before you can start creating your own certificates, you need to create the OpenSSL database. This database consists of two files where OpenSSL keeps track of all the certificates that it issued. You need to create these two files by hand before you start. Change to the home directory of your root-CA first. From there, use touch index.txt and then use echo 01 > serial to create this simple database.

  • Now that the database index files are present, you need to create the key pair and the associated key signing request. To do this, first use cd /root/root-CA to go to the root directory that is used by your certificate authority. Next, enter the command openssl req -new -keyout private/mailserverkey.pem -out certs/mailserver_req.pem -days 365. In this example, I have used the name “mailserverkey,” which makes it easy to identify what the key is used for. Of course, you can use any name you like here. With this command, you have created a new key pair of which the private key is stored in /root/root-CA/private. The public key is dropped in /root/root-CA/certs. Listing 3 shows what happens while creating these keys.

Listing 3: Creating a public and private key pair for your server.

root@mel:~/root-CA# openssl req -new -keyout private/mailserverkey.pem -out  certs/mailserver_req.pem -days 365 Generating a 1024 bit RSA private key ..................++++++ .............++++++ writing new private key to 'private/mailserverkey.pem' Enter PEM pass phrase: Verifying - Enter PEM pass phrase: ----- You are about to be asked to enter information that will be incorporated into your certificate request. What you are about to enter is called a Distinguished Name or a DN. There are quite a few fields but you can leave some blank. For some fields there will be a default value; If you enter '.', the field will be left blank. ----- Country Name (2 letter code) [AU]:NL State or Province Name (full name) [Some-State]:NB Locality Name (eg, city) []:Amsterdam Organization Name (eg, company) [Internet Widgits Pty Ltd]:SomeCompany Organizational Unit Name (eg, section) []:somewhere Common Name (eg, YOUR name) []:Me Email Address []:me@somecompany.com  Please enter the following 'extra' attributes to be sent with your certificate request. A challenge password []:novell An optional company name []:

Signing the key-pair
You have now created the CA and a key-pair that you need to get signed. If the CA that needs to sign the key would not run on your own server, you would now copy it to the server that does the signing. Since in this simple setup the CA is on the same server, you can sign the CA using the following command:
openssl ca -policy policy_anything -notext -out certs/mailservercert.pem -infiles certs/mailserver_req.pem
Make sure that you run this command from the root directory of the certificate authority as well. In this command, the default policy is used for signing the key. The name of this default policy is policy_anything and this is defined as a bunch of settings in the openssl.cnf configuration file. The option -notext is used to limit the amount of output produced by this command.

Then the name of the resulting certificate is given: certs/mailservercert.pem. This certificate can only be created because you created a signing request earlier with the name mailserver_req.pem. This mailserver_req.pem is in the certs directory. If you would need to sign a public key that is generated on another server, you only have to make sure that this public key is copied to this directory; the signing request would find it and the public-key certificate would be created without any problem. Listing 4 shows the output that is generated when signing this certificate:

Listing 4: Signing the certificate that was just created

root@mel:~/root-CA# openssl ca -policy policy_anything -notext -out certs/mailservercert.pem -infiles certs/mailserver_req.pem

Using configuration from /usr/lib/ssl/openssl.cnf, enter pass phrase for /root/root-CA/private/privkey.pem:. Check that the request matches the signature. 

Signature ok Certificate Details: Serial Number: 1 (0x1) Validity Not Before: Aug 15 09:32:12 2008 GMT Not After : Aug 15 09:32:12 2009 GMT Subject: countryName = NL stateOrProvinceName = Some-State localityName = Roosendaal organizationName = MyComp commonName = MyName emailAddress = myname@mycomp.com X509v3 extensions: X509v3 Basic Constraints: CA:FALSE Netscape Comment: OpenSSL Generated Certificate X509v3 Subject Key Identifier: BD:17:8C:D3:BD:39:E8:59:B6:47:4A:A4:FF:A1:40:8C:30:73:CD:B2 X509v3 Authority Key Identifier: keyid:83:B5:79:F1:73:23:56:42:F1:17:B8:8A:AD:CA:B6:C9:E6:79:DC:5E  Certificate is to be certified until Aug 15 09:32:12 2009 GMT (365 days) Sign the certificate? [y/n]:y  1 out of 1 certificate requests certified, commit? [y/n]y Write out database with 1 new entries Data Base Updated


You have now created the public/private key pair for your mail server and have signed it with your own self-signed root-CA. For more details on how to use the openssl command, check man openssl(1). Also note that all options, such as req and ca, have their own man page; check them for more specific details.

SSL certificate management: A practical guide

Original page is here written by Glen Kemp

One of the chores many network engineers face is the maintenance and renewal of SSL certificates. In my case this is mostly for VPN deployments, but many network appliances require a certificate for encrypted client-to-server communication. Given that I’m often met with deafening silence when I drop the bombshell that I’m going to need a cert, I’m guessing that this whole business is a bit of a black art to most. It’s perhaps no surprise when a lot of the existing resources on scary-sounding public key cryptography either assume elite ninja status or use principles that are too abstract from the practicalities. The goal here is to remedy that confusion somewhat, explain the basics and include some common real-world examples.

The basics of SSL certificates

The common garden-variety certificates used by Web servers and associated devices consist of three parts:

  • The subject private key. This contains uniquely identifiable information about the subject; this is usually a Web server, but could be an individual named user. The key is usually generated on the host itself and theoretically never leaves the privacy of the OS Key Store. At the time of generation, a certificate signing request (CSR) is also created.
  • The CA public key. The certificate authority (CA) is a server which is trusted by all parties. This can be one of any number of services, such as DigiCert or VeriSign. Additionally, this may be a private CA, like the one available in the Microsoft Windows Server operating system. The CA is considered trusted if there is a copy of its public key in the certificate store of the connecting client; either the Web browser or the OS itself.
  • The subject public key. The public key is created when the CA signs the information held in the CSR file generated from the private key. The public key is designed to be transferred in the clear and contains a signature that verifies the authenticity and validates applicable use such as server or client authentication.

When our subject server receives a connection request, it presents its signed public key so that the client may verify its identity. If the client trusts our public key, the ciphers are negotiated and the public key is used to encrypt the client session key. This session key can only be decrypted by our private key, and the rest of the secure socket connection can be completed.

Wild card certificates

At the creation of the private key, the common name (CN) is specified; in most cases this is the fully qualified domain name (FQDN) of the host, such as www.foo.com. If many servers require protection, it is often more economical and practical to create a wildcard certificate for all hosts on a given domain. This is also very helpful when you need several virtual identities such as “www.foo.com,” “mail.foo.com” and “ssl.foo.com” on a logical host, such as a load balancer. At key generation, instead of using a single FQDN for a specific host, the host portion is replaced with a wild card, such as “*.com.” As a result, the certificate is valid for anything on the DNS domain, but not usually any subdomains. Most modern client browsers support wild cards, but you may run into a few exceptions with embedded browsers or early versions of Internet Explorer.

Subject Alternate Name

A relatively obscure but useful feature is Subject Alternate Name (SAN). If you require the features of a wild card certificate but are expecting connections from legacy clients, some CAs will sign the subject public key with a number of valid alternate names. Even ancient client SSL implementations support this feature, which allows the subject public key fields as such:

  • CN = *.foo.com
  • SAN = www.foo.com, mail.foo.com, ssl.foo.com

Even if the client doesn’t understand the wild card in the subject common name, it should still match one of the alternative names and accept the certificate as valid.

Intermediate CA

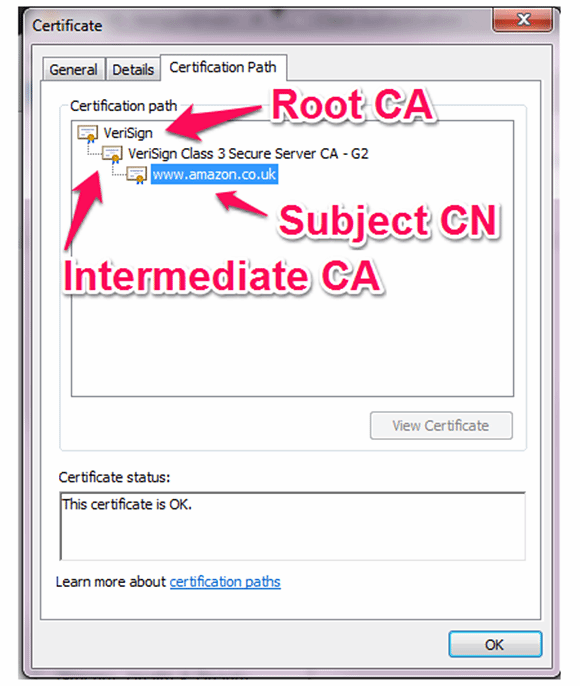
The vast majority of client certificates are not issued by a root-level CA but by anintermediate certificate issuing CA. Essentially, the root-level CA signs the public key of an intermediate CA, permitting it to sign certificates on its behalf. This can happen several times, and you could end up with a chain of certificates several layers deep. In the below example, the subject’s certificate, “www.amazon.co.uk,” has been signed by the VeriSign Class 3 Secure Server CA – G2, which is in turn signed by the VeriSign root certificate.

Intermediate certifying CA

The common intermediary certificates are embedded in client certificate stores, but many legitimate intermediaries from Internet service providers or domain registrars are not. The intermediary certificates need to be attached to the Web server so that the client can follow the chain until it finds a certificate signed by a trusted CA. In my experience, this is the No. 1 reason why users still receive certificate trust errors when connecting to a website that has a paid-for certificate. Certificate authorities provide a bundle of root and subordinate public keys that need to be imported into the Web server configuration. Many CAs provide online tools that check whether the intermediaries have been installed correctly. When importing your signed public key, it is worth checking whether the intermediaries require attention to avoid the inevitable support call.

Certificate management

The OpenSSL cryptographic toolkit is the engineer’s Swiss army knife for certificate management. The binaries are included in most *nix distributions and are also available forWindows. This powerful utility is worth learning to prevent remembering the nuances of native certificate management on multiple platforms. The “lite” version is sufficient for most day-to-day needs.

Microsoft .PFX files bundle keys

PFX files are commonly used in Microsoft environments; typically, the key is generated within Windows and then automatically signed by a domain-integrated CA. It is useful because the private key, the signed public key and the CA public key are bundled into a single file. The key is optionally encrypted with a passphrase to provide some level of protection should you wish to transfer the certificate across a public network. Using OpenSSL, the individual components can be exported and converted. These files contain no human-readable component.

PEM and DER encoding

The common x.509v3 certificates are encoded in one of two formats, PEM or DER, and are typically given either a .CRT or .CER file extension. The file extensions themselves do not tell you much about their format as they are used interchangeably, but the contents can give you a pointer.PEM files are Base-64 ASCII-encoded and are prefixed with “—- BEGIN CERTIFICATE —-” and suffixed with “—- END CERTIFICATE —-.” DER files are binary-encoded and are not human-readable.

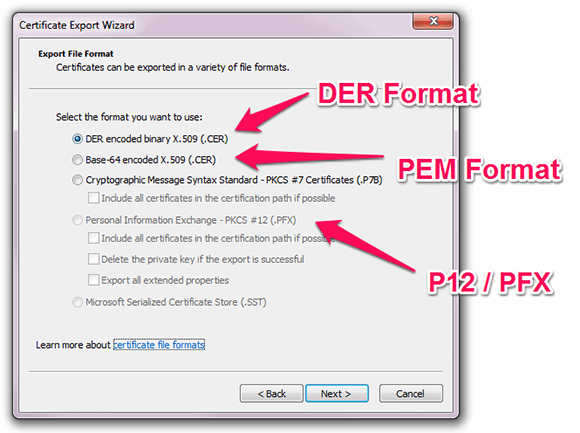
When exporting a certificate from Windows, you are offered three common formats: DER, PEM and P12, although which is which is not very clear.

Windows offers three common formats

Many network appliances require certificates and keys to be imported in PEM format, but the Windows MMC certificate management snap-in will only permit private keys to be exported in P12 format.

Private key exported in .P12

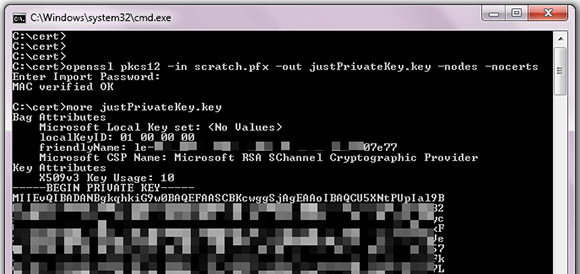
This is only half the battle, since you will also need to extract the signed subject public key.

Extracting the Public Key in PEM format from a PFX file

Extracting public key from pfx

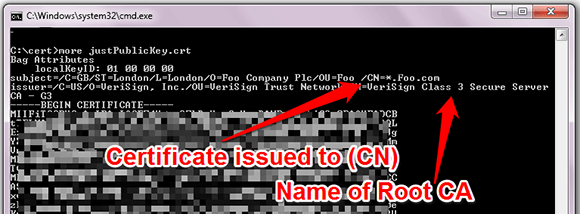
The exported subject public key clearly shows the common name of the server it was issued to and the name of the root CA that signed it. It is important to check that you are manipulating the correct certificate (i.e., the one signed by a commercial CA and not an internal domain CA).

Name of root CA

To reverse the process and combine a private key, public key and CA certificate into a single file, use the following command:

C:\cert>openssl pkcs12 -export -out NewPfx.pfx -inkey justPrivateKey.key -in justPublicKey.crt -certfile CACert.crt

Loading ‘screen’ into random state – done

Enter Export Password: <set new passphrase>

Verifying – Enter Export Password: <repeat new passphrase>

Converting between PEM and DER

Another common requirement is to convert PEM encoded files to DER encoding:

C:\cert>openssl x509 -outform der -in justPublicKey.pem -out justPublicKey.der

Then, convert them back again:

C:\cert>openssl x509 -inform der -in justPublicKey.der -out justPublicKey.pem

It is worth noting that this process will typically strip out the plain-text-extended attributes and leave you with only the raw certificate between the “—- BEGIN CERTIFICATE —-” and “—- END CERTIFICATE —-” buffers.

Troubleshooting certificate management

Inevitably, you will end up in the situation where something is not working correctly. If that’s the case, the first step is to use OpenSSL’s native tools to check that your keys and certificates are correctly formatted.

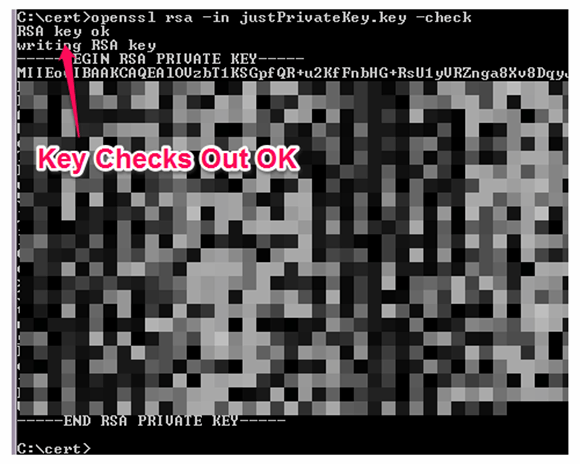
To check a private key file:

C:\cert>openssl rsa -in justPrivateKey.key –check

Key checks out OK

To check a CSR:

Key strength

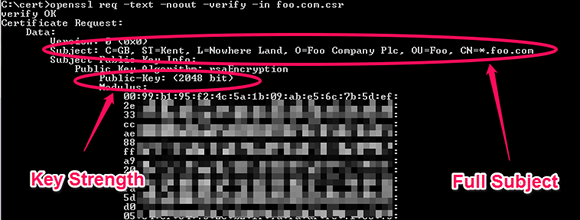
The above example clearly shows the entire certificate subject. The two key pieces here are the “O=” (Organization) and the “CN=” (Canonical Name). The organization field must exactly match your registered organization name. For example, if you are incorporated as “Foo Company Plc (UK),” a submission for “Foo Company UK” will be rejected. Additionally, the domain name specified in the certificate must be registered by you or an authorized third party.

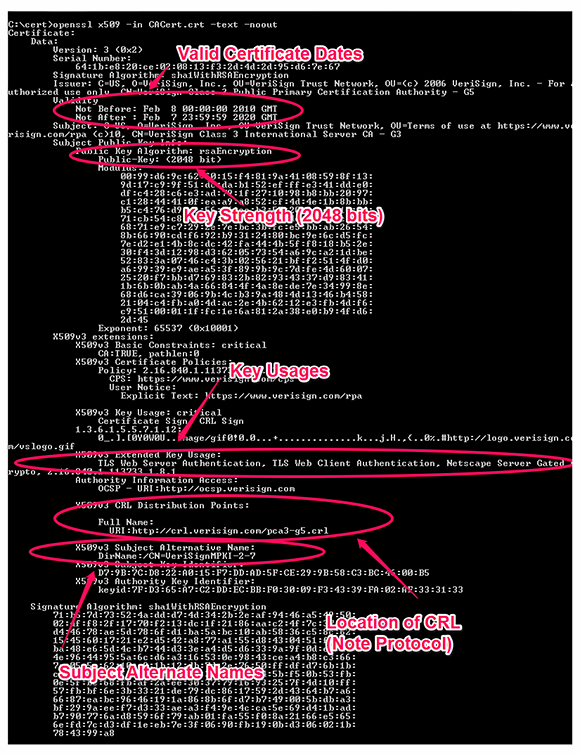
To verify a certificate (PEM or DER format):

C:\cert>openssl x509 -in CACert.crt -text -noout

In the instance below, I’ve the analyzed a VeriSign CA public key, but lots of useful information can be gathered from here and checked:

  • Certificate valid dates. All certificates have a window of validity before they need to be re-signed. Web server certificates are usually valid for no longer than three years, while CA certificates tend be in the region of 10 or more years. An inexperienced network administrator may create a domain root CA with a certificate valid for a single year. In this case, the CA root certificate would expire and invalidate the trust, even if the signed certificates were valid for a much longer period of time.
  • Key strength. RSA keys have a given strength: The more bits are used, the more difficult it is to guess. Many public CAs today will only sign 2,048 bit keys, but it is not uncommon to find 1,024 or even 512 bit keys being used in internal applications.
  • Key usages. Unless you are doing something obscure, at minimum this should includetransport layer security Web server authentication and TLS Web client authentication.
  • Certificate revocation list (CRL) and online certificate status protocol (OCSP) distribution points. Some clients will do additional real-time checks of certificates to ensure they have not been revoked using either static CRL or the dynamic OSCP protocol. Public CAs make these services publically accessible, but private CAs may not have these correctly configured or accessible from remote clients.
  • Subject Alternate Names. As discussed earlier, SANs allow a certificate to possess several different identities. Any configured SANs may explain why a certificate passes validation even though the apparent subject name is different.

VeriSign example

About the author: Glen Kemp is an enterprise solutions architect for a UK-based managed services provider. He designs and deploys network and application security tools, including access control, remote access, firewalls and other “keep the bad guys out” technologies. He is an experienced professional services consultant; delivering Elephants and not hunting Unicorns. He is also a guest blogger for the Packet Pushers Podcast and a Juniper Ambassador. Follow him on Twitter @ssl_boy.


Linux kernel panic

A Linux kernel panic is a computer error from which the Linux operating system (OS) cannot quickly or easily recover.

The kernel provides basic services for all other parts of the operating system. Kernel panics are generally caused by an element beyond the Linux kernel’s control, including bad drivers, overtaxed memory and software bugs. The Linux platform is open-source, unlike Mac and Windows, so kernel development is open and collaborative.

Linux administrators can study the Linux kernel panic log to determine root causes, or dump the kernel contents with the crash utility for later analysis. Once the cause is determined, Linux kernel panics with commands can be resolved with programming that instructs the kernel how to debug the offending program, change a configuration or file path or make changes in the BIOS.

Original page here

Securing FTP on the Internet

File transfer security is important when transferring files across the Internet. One of the often overlooked areas, when addressing layered security, is file transfer security. Some companies (including Internet Service Providers) seldom make the switch, in a timely manner, to replace File Transfer Protocol (FTP) clients with a secured solution such as Secure FTP (SFTP) and a Secure Shell (SSH2) Server. Other companies replace Telnet servers with SSH servers, but do not address file transfer security. Then there are companies that implement SFTP with an SSH2 Server, and overlook users that utilize FTP clients for file transfers in other areas. This article provides the answers that you will need to configure and operate an SFTP client (SecureFX) with an SSH2 Server (WinSSHD) –securely.

When was the last time that confidential data was delivered over a standard non-secure transfer program, such as an FTP client, in your company or over the Internet?

Companies sending sensitive files over a network – unencrypted and unprotected – may find it more difficult to establish secure transfers and an overall sense of ‘real’ data security. File transfers that use the standard File Transfer Protocol (FTP) are susceptible to eavesdroppers, and can greatly benefit from the high level encryption ciphers and security that SSH2 protocol offers. By implementing an SFTP client with an SSH2 Server organizations can expect to achieve an effective level of file transfer security.

Transferring files (manually or automatically) can be done without security, however, with the availability of SSH2 – and the ease of setup of an SFTP client and an SSH2 server – confidential file transfers no longer have to be exposed to unwanted network solicitors. Let’s begin to secure your file transfers by configuring an SFTP client and SSH2 server. In this case we’ll use SecureFX by Vandyke Software (www.vandyke.com), and WinSSHD Server by Bitvise Products (www.bitvise.com).

NOTE: It is important to note that the hands-on tips included in this article (as with other articles I have written) have been fully tested in a live production environment that supports many users and file transfer requirements.

The SecureFX client requires SSH2 (I’ll describe SSH2 later) utilizes an interface similar to Windows Explorer, is quickly configurable with password authentication and public key support, and works very well with WinSSHD Server to establish a ‘real’ sense of security moving forward. A 30-day evaluation copy of SecureFX is available and can be downloaded at http://www.vandyke.com/download/securefx/index.html.

If budget constraint is an important issue, then check out www.openssh.org for free SSH clients, such as WinSCP (secure copy with PuTTY) and Secure iExplorer GPL (another Explorer-like interface), for the Windows platform. However, keep in mind that some free clients – as is the case with some third-party clients – may only be compatible with SSH1 and not SSH2 protocol. SSH2 provides improvements over SSH1 and both versions protect sensitive data in file transfers by utilizing strong cryptography that is difficult to hack. Although SSH is typically used to address the security issues of telnet, remote shell (rsh), and remote login (rlogin), standard non-secure transfer programs can benefit from SSH2.

The combination of password and public key authentication (private / public key pair) using digital signatures – per account or shared key among trusted hosts – enable host-to-host encrypted connections over an insecure infrastructure, such as the Internet. However, depending on the size of the organization, it is important to plan ahead and determine the number of public keys that will be supported by the SSH2 server. For example, WinSSHD Server can be configured to require 1) a password or key, and 2) a password and key combination for authentication. But rather than generate a key from every host and then register the key on the WinSSHD Server, you can copy the private / public key pair and distribute the key pair to a group of trusted hosts. Unlike the private key, which is stored on the host side only, the public key is uploaded to the WinSSHD Server, and is stored on both the host, and on the server; the server acknowledges the public key, once uploaded and assigned to a specific login account. If supporting both password and key authentication, the client must be configured to match the authentication set on the WinSSHD Server.

SecureFX (SFTP Client)

Consider changing the default SSH2 port 22 to a unique port (refer tohttp://www.iana.org/assignments/port-numbers for a 5 digit port number) on the SFTP client and SSH2 server. Create a new session by going to File>Connect and then selecting the New Session Wizard. Choose SFTP for Protocol, enter the Host IP address of the WinSSHD Server, and replace port 22 with a unique port.

Next, enter the username and password created on the WinSSHD Server – the username is an account that exists locally on the server. The Initial Directory and other connection settings can be overwritten by the configuration set on the WinSSHD Server. Right-click on the newly created session and select Properties.

Next, confirm that Protocol, Hostname, Port, and Username reflect your input. (Note that password is set for primary authentication; secondary authentication is set to none, by default. We will revisit this section later on.) Go to Category>Site>SSH2 Options and confirm that “None” is NOT selected for Cipher or MAC. Now, double-click on the new session to authenticate to the WinSSHD Server using password. Upon contacting the server, you will receive a New Host Key message box. Click on the Accept & Save button to accept the host key (e.g., MD5 hash fingerprint) from the server.

At this time, you should be able to log in using password authentication. If you receive an error: “Unable to authenticate using any of the configured authentication methods,” it is most likely due to the setting “PWD and Key” in WinSSHD Server (see below) – in which case, you will need to change the SFTP client authentication to “Password and Key”, to match the authentication requirements of the server. Now let’s create the public-key that will be copied up to the WinSSHD Server. To generate a new public / private key pair, go to Tools>Create Public Key to launch the Key Generation Wizard. Select DSA For Key type, enter a Passphrase, and then select 1024 bits (minimum recommended strength) for Key length. Next, move the mouse around to create random input for the key generation process. Name the private key and note the default location for both keys (the public key has the suffix .pub):

C:Documents and Settings<username>Application DataVanDykeSecureFX<FILE>

Use the key as global public key. The public key is now available and can be copied up to the WinSSHD Server; only the public key will need to be copied to the server, the private key will be stored on the SFTP client (host). If the public key will be shared, then copy the key pair and store the files in the above path on the other hosts. Instead of generating a key next time, go to Category>General>Options>SSH2 and then load the public key (do not attempt to load the private key, this key has to be present with the public key in the same folder.) If the public key will not be shared, then generate a public key on each host and then assign the key on the WinSSHD Server to the user account. After you have copied the public key to the WinSSHD Server and assigned the key to an account, go back to File>Connect and select Properties on the recently created session. In Site, change the Secondary Authentication from none to Public Key, and click on the Properties button. Select the newly created public key (that was previously copied up to the WinSSHD Server). Make sure that you have stored the public key in the appropriate folder on both the SFTP host and the WinSSHD Server. WinSSHD Server In WinSSHD Control Panel, click on the Edit/View Settings button in the Settings tab, and change the default SSH2 port 22 to a unique port (refer to http://www.iana.org/assignments/port-numbers for a 5 digit port number). Next, go to Settings>Access Control>Template and set the following:

Permit Remote Administration = No Map Remote Home Directory = No Permit Terminal Shell = No Terminal Shell = C:Program FilesBitvise WinSSHDsftps.exe Initial Directory = C:<unique folder name> Permit Exec Requests = No Permit C2S Port Forwarding = No Permit S2C Port Forwarding = No

Drop down to the Accounts section and deny “all others” from authenticating to WinSSHD. Enter a local Win2K/NT account, and change the Authentication Type to “PWD and Key”. Except for SFTP, everything else on the account should be set to no. Click on the Keys field for the account that will use the public key (the one created on the SecureFX client), and import the key.

Stop and Start the WinSSHD service.

Note: Use caution when using PuTTY as there have been reported bugs, such as no limits on socket buffering and issues with SCP.

Congratulations! You have configured an SFTP client and an SSH2 server.

Original page here